Drawing this trophy requires balancing the large handles against the central cup. Use a vertical line to keep both sides even. You will end up with a bold, graphic representation of the silver cup.
About the Champions League Trophy
The trophy is officially known as the European Champion Clubs' Cup. It features two very large handles that extend from the rim to the middle of the body.
What you need
- HB pencil for the construction lines
- Black chisel-tip marker for the outlines
- Fine black marker for the details
- Eraser
- White cardstock or thick paper
The 8 steps
Light comes from the upper left in every step. Each picture shows the drawing as it should look when that step is done.

Step 1: Center line and oval
Use the HB pencil to draw a straight vertical line and a tall oval for the main cup body.
Common mistake: Beginners often draw the oval too wide, so keep it narrow enough to leave room for the large handles.

Step 2: Base and neck
Draw a small oval for the base and connect it to the main body with two short lines using the HB pencil.
Common mistake: The base can end up too large; ensure it is much narrower than the main cup body.

Step 3: Handle guides
Sketch two large, symmetrical curves for the handles with the HB pencil, starting from the top rim area.
Common mistake: The handles are often drawn too small, so make sure they extend well past the sides of the cup.

Step 4: Main body outline
Switch to the black chisel-tip marker and trace over the main oval and the base with a bold line.
Common mistake: Moving too fast can cause wobbly lines; use slow, steady pressure with the chisel tip.

Step 5: Handle outlines
Use the chisel-tip marker to draw the outer curves of the handles, making them thick and bold.
Common mistake: Beginners may forget to make the handles symmetrical, so compare both sides before marking.

Step 6: Rim and handle thickness
Switch to the fine marker to draw the top rim and the inner lines that show the thickness of the handles.
Common mistake: Drawing the inner handle lines too close to the outer ones makes them look thin; leave a clear gap.

Step 7: Base and text band
Add a horizontal line across the top of the cup and small details on the base using the fine marker.
Common mistake: Do not try to write actual words, as small scribbles or simple lines better represent the engraved text.

Step 8: Reflection lines and cleanup
Erase all pencil lines, then use the fine marker to add a few vertical lines to suggest metallic reflections.
Common mistake: Adding too many reflection lines can clutter the drawing, so keep them sparse and mostly on the right side.
What makes it look right
- Keep the central vertical line until the very end to ensure the handles stay level.
- Use the wide edge of the chisel-tip marker for the outermost silhouette to make it stand out.
- Leave white space between the fine marker lines to simulate the shine of polished silver.
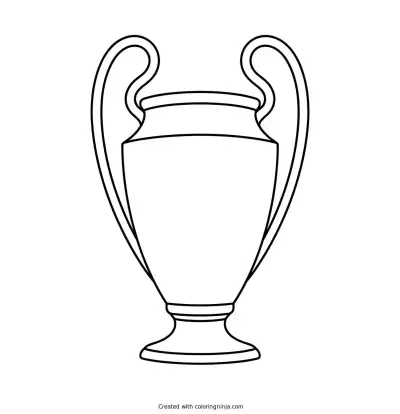
Get the finished coloring page
The clean outline from step 8, ready to print and colour.
View the coloring pageThe whole lesson on one sheet
All 8 steps with their captions on one page. Print it and keep it next to your paper.

The trophy is now complete with its distinct 'big ears' and bold outlines. Practice drawing different sizes to master the symmetry of the handles.